

How to build a low-cost high-performance marketing machine (Part 1)
Have you ever stood in awe just how some companies, products or websites are able to time their messages just right over multiple channels, or how their customer service knew just about everything about you? Apps send you push-notifications when you quit the app with items in your shopping cart, websites send you recommendations based on what you consumed before, etc...
Have you ever stood in awe just how some companies, products or websites are able to time their messages just right over multiple channels, or how their customer service knew just about everything about you? Apps send you push-notifications when you quit the app with items in your shopping cart, websites send you recommendations based on what you consumed before, etc...
While this is something consumers nowadays expect, as someone building their own product this can be extremely hard to implement and is usually an after-thought.
This is Part 1 of a two part series on Intercom. The first part deals with the technical set-up outside of Intercom whereas Part 2 will show some real-live examples of what you can do with the set-up.
For many, the go-to solution is to implement a ready-to-use platform. Some examples are Crisp or Intercom (or any other Live-Chat and messaging solution). That'll do the trick you might tell yourself - and that's definitely what they tell you. Just check Intercom's Engagement Feature pitch.

However, you'll quickly find yourself limited by the default properties Intercom provides. Send an email when you have a new sign-up? Check ✅. Send an email when the user filled their profile - or even more importantly fails to fill their profile - what do you do then? 🤔
Intercom promises you that you'll be able to send messages based on properties of your Customers - which it can do. In the example above, the product logs how many teammates the specific user has. Your product could have any custom properties. For my Product, the edu-tech start-up Educatly we are looking at the % of profile completion or the number of applications to programs the user has sent out. Somehow this information needs to be pushed into Intercom - they cannot magically gather it. So how do you do it?
Can't be bothered to set all of this up yourself? Get in touch with me to discuss how we can collaborate!
If you have a development team who is ready to go to implement this, all the power to you, let them handle it. If you can do that, stop reading right now and let them do it. I'm serious. What I'm about to tell you is not the best practice.
As an early-stage start-up that has yet to receive major funding, most of our initial investment went into the development of our platform which is currently built and maintained with a fixed scope contract by our trusted development partner Commutatus, a start-up based in Chennai, India.
If you're like me and you're currently responsible for product or marketing in an early stage start-up where all that counts is the ability to quickly build solutions to fix problems and you can worry about scalability or stability later, it will probably delight you if I tell you you can set this up yourself. Yes, you. All you need is Google Tag Manager and some basic knowledge of HTML and JavaScript. If you don't have it, don't worry. I will walk you through.
Google Tag Manager...
... is a free tool that allows you manage and deploy marketing tags (snippets of code or tracking pixels) on your website (or mobile app) without having to modify the code (from Orbitmedia) in a container that you can put on your website.
I will explain how you can do it by going along some of the use-cases we have implemented. But first, let me explain a bit about how Intercom works. There are events and attributes. Events are what a user is doing, i.e. visiting a specific page, pressing a specific button or completing a certain task on your platform. Attributes are information in your user profile, such as their age, % of profile completion, missing fields, etc…
For you to make your own strategy and decide how you can implement it with Intercom, it is important to know whether to use events or attributes for what you want to achieve. You can see below the different things we are going to cover in the post to identify your own strategy:
- Applications: The whole point of Educatly is to connect education seekers to universities. So we want to be able to follow up on each specific application, as well as allow our operations team to segment users based on which university they applied to. This is achieved through Events tracking.
- Blog visits: Part of our acquisition strategy is to engage potential and existing customers with blog posts. As such, we want to track when they read them and send them further content based on what they read before. This is achieved through Events tracking.
- Engagement: Part of our vision is to create a community of education seekers and education providers. That's why it is essential to know whether users are engaging with our universities and in the community, such as following each other, making posts or comments. This is achieved through Events tracking. Additionally, we also store the number of followers, posts and applications users have to identify our highly active leads.
- Profile Completion: We want to know the % of profile completion of users so we are able to nudge them through messages until they actually fill their profile. This is achieved through Attributes tracking.
Events
We'll start with Events because they are considerably easier to set-up.

Before we go into the nitty-gritty of how to set it up, though, I need to give you a brief about Google Tag Manager. First, you need to ensure whether your platform has Google Tag Manager installed. There's a simple guide that you can follow from Elevar. Once you have verified that you have Google Tag Manager installed, just ask your developers to give you access. If you don't have Google Tag Manager implemented, there's not much you can do. You need this. However, this should really not take much more than half an hour to do for anybody. If you have a custom developed website, fork over that money to your developers and ask them to put it. If your website is running on a specific software like Wordpress, Wix.com, Squarespace, etc... there should be plenty of tutorials available on how to set-up Google Tag Manager.
You have access to Google Tag Manager now? Good. Let's continue. Once you have logged in, you are most likely to see something like this:

Simply select your container and you should see the dashboard. On the left hand-side, you will see Tags and Triggers.

Triggers allow you to define the specific user-action the user needs to do that will trigger Google Tag Manager to run a small function that will send this information to Intercom.

So as we go through the use-cases below, every time we will set-up a Trigger and a Tag. This combination together is all the magic, we are looking for!
Applications
Let's start with the most straight forward example. When a user clicks the Apply button for a specific program on Educatly.com, we want to send the information that the user has applied to Intercom in the form of an event. So what do we have to do first? Exactly; set-up the Trigger. So let's go into Triggers on Google Tag Manager.

Every Trigger has a Name, Trigger Type and Trigger Fire options. You might think setting up a Name is trivial, which it can be. However, once you have 20+ or even more triggers, it can get very confusing. So it's best to already start thinking about the nomenclature, so you (or anyone else working with this) will be able to understand things immediately. If you check my example above, I chose to name my Triggers based on the Trigger Type (click) and what the user has clicked (Subscribe Button - this is just an example from this website, not Educatly. We're still working on Applications). In this case, I decided to call the Trigger Program - Apply, because the page the user is on is the Program page and the action is Apply. Next up is the Trigger Type. Google Tag Manager offers various triggers based on user action. The most common ones will be Page View, Click (All Elements) and History Change. For this example, we are choosing Click (All Elements).

Once you chose a Trigger Type and you selected This trigger fires on Some Clicks (All Clicks would trigger literally any time a user clicks anywhere on your page - pretty useless), you need to define what your user actually clicks on - basically when the Trigger Fires, using HTML properties. If you had selected a different trigger type, you would also have to further define when your Trigger Fires, i.e. which page the user viewed.

Sometimes, not all properties will be available. In this case, you scroll all the way down in the dropdown until you find Choose Built-In Variable, and ensure that each variable has the checkbox checked.

Now we need to do a little excourse into HTML with this example:

We need to teach Google Tag Manager to understand when the user is clicking on the Easy Apply button on the top-right - and not only on the button for this particular study program, but whenever this button appears on any program page. Let's go through the most common properties that Google Tag Manager gives us. Usually Google Tag Manager presents you all available properties for all Trigger Types, but when tracking clicks, you only need to focus on the ones that have Click in their name.
- Click URL: This is the URL on which the user currently is. You can match it in an exact way, for example if we wanted to track clicks only for a specific program page, or you can look if the URL contains a specific word or string. The complete URL in our case would be https://www.educatly.com/programs/128563/master-in-international-marketing-and-sales-management, but the part that we want to match is https://www.educatly.com/programs/, since this will be true for any of our program pages that the user will visit.
- Click Text: This refers to the text of the element the user clicks on. In oujr case this would be Easy Apply. However, in some cases this button will read Apply. We could choose to use this property to identify the button, knowing then that we need to create another Trigger with the Click Text Apply to ensure we can track all button clicks.
- Click Target: This would be the URL that the button is leading the user to. This can be a valid option for static websites, such as blogs, but in our case, Educatly.com is a dynamic web-app and there is actually no target. The user stays on the same page after pressing apply.
- Click Classes & Click ID: In HTML, any element usually has a Class or an ID by which it can be identified. The difference between IDs and Classes is that IDs can only occur once over one webpage. So if you decide to call a button on top of the page button-1, you cannot call another button button-1 further down. Classes can be used over multiple elements. You could use the Class button to specify all buttons and then individual IDs to give each specific button a name. It is highly unlikely that you will have elements that use neither Classes or IDs, so this is usually the best way to specify an element. Whether your website uses Classes, IDs or a combination of both depends on how it has been built by the developers, so this is something you have to figure out. So how do we find the Classes or ID? Read on!
Excourse: Inspecting elements
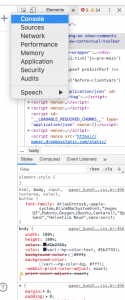
In order to find the Classes or ID of a specific element, we actually need to go into the code of the website and learn how to read it. Scary? Not so much. It's actually quite easy. We'll take use of Google Chrome's handy Inspect feature. When viewing your webpage, simply press the kebab menu (three dots) on the top-right, go to More Tools and click on Developer Tools. A new section on the right of your browser will pop-up. Then you click on the Inspect icon on the top right. You can also just use the shortcut ⌘⇧C.

This will allow you to literally select any element on your website and on the right hand-side you will start to see the code.

You can find the Class in the code. The element that you selected is highlighted in blue and you will see it says:
<button class="program-apply-button">Easy Apply</button>
What is interesting for us is class="program-apply-button". This means that Click Classes is program-apply-button. Take note that here we do not have an ID, however, it could have. Let's assume this button would have the ID button-1, then the code would have been like this:
<button id="button-1" class="program-apply-button">Easy Apply</button>
So I hope now you can guess how we will properly define all possible Trigger Fires for this example? See the screenshot below:

As mentioned above, we want to make sure that we are able to trigger the apply button when it says Apply and when it says Easy Apply and only on the Programs page, and to give us the utmost confidence we do not trigger any other button that might say Apply on the Programs Page, we are also adding the Click Classes.
In some rare cases, it can be hard to pinpoint the exact element that you need with confidence using the properties above. Either your website has different elements that you don't want to track but cannot separate or your element uses none of the properties (maybe you want to track a button that has no Text, no Target, no ID and no Classes. In the first case, you need to make a decision whether you are fine with a bit of ambiguity and are okay if wrong clicks are being tracked. For the other case, you can ask your developers to give the button an ID.
Now that we have set-up the Trigger (don't forget to save!), we can set-up the Tag. Just click Tag on the left hand-side. Press New and select Choose a tag type to begin setup. You will see a lot of different Tag Types. These are basically pre-defined scripts that speak to a third-party platform (such as Intercom) to push information into them. You will see that Intercom is absent from that list. This means that unfortunately, we cannot use a pre-defined script and need to write the script on our own. That's why under Custom, you will select Custom HTML.

If you want you can read Intercom's documentation on setting up Event tracking. The bottom-line is that you can call a custom function to send information to Intercom. The example they give is the following:
Intercom('trackEvent', 'purchased-item');
'trackEvent' tells Intercom that the information we are about to send is an event. 'purchased-item' is the name of the event. If this function is called, you will find purchased-item under the list of events for the specific user for whom this functon was called.
Back to our example. The Intercom function in our example looks like this:
Intercom('trackEvent', 'Applied');
Easy enough. We're telling Intercom that we are sending an event and the event is called Applied. So how does the code in Google Tag Manager look like?

The reason for <script> and </script> around our Intercom function is simply there to declare that what we are calling is Javascript (a different language), instead of HTML.
This is it! Your Tag is set-up. Scroll down and click on Choose a trigger to make this tag fire. From the list that shows up, you need to select the Trigger you had defined before. If you decided to set-up multiple triggers (if you want to send the same event to Intercom for two different user actions), then you can select multiple triggers here. Then you press Save! This is now the time when we need to test if our set-up works. Find the Preview button on the top-right. This will deploy your Tags and Triggers to your website, but only for you. Your site visitors will not be able to trigger anything, yet.

If you already have your website open, refresh. You should see a new section popping up from the bottom. This is put there by Google Tag Manager.

If you scroll down within the Tag Manager section, you should find your newly created Tag under Tags Not Fired On This Page. Then, when you do your action, it should jump to Tags Not Fired On This Page.
Note: If this does not happen, something is wrong. You probably have not properly identified your user action according to the properties. You can cross-check this. You will see that for every action you do, a new numbered entry pops-up under Summary. Find the one that appeared for when you did the action you are tracking and then select Variables.

You can see the different properties that the specific user action has and adjust your Trigger accordingly.
Alternatively, you can go to Tags and find your Tag under Tags Not Fired On This Page and click on it.

You will be presented with the properties of your Trigger and which ones were fired or not fired, accordingly.
If everything was set-up correctly you can go back to Google Tag Manager and press Submit. In the pop-up, give a descriptive Version Name to ensure you or anyone else will be able to identify it in case you need to roll back at one point and then click Publish! As a final test, go to your website again and do the user-action and then check Intercom if it, in fact, does show up.

Intercom has a limitation of only allowing a maximum of 200 individual events, so whatever you are doing you need to work around this. In my case, I didn't know this and I was tracking the name of the program our students were applying to. After our users had applied to a total of 200 individual programs, no new data was being logged anymore and it took me a while to figure out why.
You can always check under Settings -> {Account name} Data -> Events and archive events. Archiving will take immediate effect and you can immediately start logging new events.
Note: It's only possible to view events less than 90 days old in the activity timeline, both in user profiles and via the API. However, you can still filter and message users based on events older than 90 days. This will not affect the first/last occurred dates if they are over 90 days ago.
From Intercom.io
Attributes
You have now successfully learned how to set-up Triggers, Tags for Intercom Events, how to Preview and debug your Tags and Triggers, as well as Publishing. Good stuff! Before I go deeper into further Event tracking, I will explain you one example for Attributes. The example is Profile Completion. On Educatly.com, every user has. a profile that they need to fill at least 70% for our smart algorithm to pick-up and suggest programs. When they fill it out, the website displays the percentage of. completion and this information we are going to push into Intercom.

Let's start with the Trigger. The most straight forward way would be to simply use the Page View trigger and use the URL https://www.educatly.com/dashboard, which would mean every time a user sees this page, our Trigger fires, and the Tag takes care of the rest. True. However, Page View gets triggered every time a new webpage gets loaded. Educatly.com is a dynamic web app, which does not trigger a new Page View. This is why in this case we use History Change, which gets triggered, every time your browser visits a. new URL, which is the case here. Then we simply select the property Page Path contains dashboard. Page Path is similar to Page URL or Click URL. Whereas URL refers to the entire URL (https://www.educatly.com/dashboard), Path refers to everything after the domain (/dashboard). It is advisable to use Path over URL whenever possible.

Now we can set-up the Tag and again we will use Custom HTML and we will write our own code again. If you want you can read Intercom's documentation on setting up Event tracking. The example Intercom gives is the following:
window.intercomSettings = {
email: "bob@example.com",
user_id: "123",
app_id: "abc1234",
created_at: 1234567890,
"subdomain": "intercom", // Put quotes around text strings
"teammates": 4, // Send numbers without quotes
"active_accounts": 12,
"last_order_at" : 1350466020, // Send dates in unix timestamp format and end key names with "_at"
"custom_domain": null // Send null when no value exists for a user
}
Since you are already using Intercom, I assume your developers already have set-up something like this. At least you are sending email, user_id, app_id, and created_at to Intercom from your website, otherwise, you would not be able to track logged-in users.
Our job is now to add more custom attributes to this information package that your website already sends to Intercom. How might we do that? Very easy. See the code below:
window.intercomSettings = {
"profile_completion": 100,
}
Intercom('update');
As you can see, we are calling the same window.intercomSettings, but just adding additional attributes, such as profile_completion. We do not need to repeat the attributes that were already sent by the information package.
Note: If you actually do not have Intercom set-up, yet, you can use the same principle to implement a full Intercom installation without the help of your developers. Contact me if you need help doing so.
Intercom('update') forces Intercom to recheck the information package that your website is already sending and then it will add in this information. There is something wrong with that code, though. Are you able to figure out what it is? If we were to implement this, we would show a profile completion score of 100 for all of our users. We need to teach our script to read the actual profile completion score - and we do this with programming in Javascript. The full code is:
<script>
profile_completion = document.getElementsByClassName("progress-bar-label")[0].innerHTML.split("%")[0];
window.intercomSettings = {
"profile_completion": profile_completion,
}
Intercom('update');
</script>
One of the changes you will notice is that now we are not putting the number 100, but the variable profile_completion. In line 2, we are declaring the variable profile_completion with a Javascript function. Whatever the score is, this function will return it. The variable will assume this value and it will be thus pushed into Intercom. So let’s break down this function:
profile_completion = document.getElementsByClassName("progress-bar-label")[0].innerHTML.split("%")[0];
It consists of the following elements: document.getElementsByClassName(), "progress-bar-label", [0], .innerHTML, split(), "%" and [0]. document.getElementsByClassName() is a Javascript function that will look through your entire webpage and will find all elements that belong to a specific class. We learned before how classes are annotated in HTML.

As document.getElementsByClassName("progress-bar-label") finds all elements belonging to the class "progress-bar-label", we need to select the right one. [0] will select the first (in programming, the first element of any group is usually annotated as the 0st) of all elements found, even if there is only one. Let’s try this out for ourselves. Google Chrome allows you to execute Javascript code right in the browser and observe what happens. For this, we select the Console in our Developer Tool window. If you closed the Developer Tools, you can open them again by opening the kebab menu (three dots on the top right), going to More Tools and then Developer Tools. You then press on the two arrows and select Console, which will display a new window that gives you a text field.
If you paste document.getElementsByClassName("progress-bar-label") there and press enter, you will get a result of the executed function.
You can see by expanding the displayed result and hovering over the label.progress-bar-label and observing the tooltip appearing on your webpage that this selected the right element. It also displays that this is the 0th element.

Subsequently, by appending .innerHTML, we tell the Javascript function to get whatever is within the <label></label> element and you get the result "27% Complete". Seems like we’re almost there - but we want the number 27 only.
.split() tells our function that we want to split the result and % is the character we want to split it by. This means "27% Complete" will be separated into two elements: "27" (the 0th element) and "Complete" (the 1st element). The % disappears.
Since the previous split produces two elements and we want the number, we select the 0th by appending [0]. Pasting the final function of document.getElementsByClassName("progress-bar-label")[0].innerHTML.split("%")[0]; will give you the result 27.

Just like in the previous step, you can first use Preview to debug and then you Submit your changes. You will see the new Attribute appearing in Intercom!
That’s it. Now you know how to successfully set attributes.
Now we will finish up with some of the different use cases I mentioned above.
Note: I will explain how my existing code works, but if anything you are trying to do derives from the examples given here, I advise you do a crash course in HTML and Javascript. Contact me, if you require help!
Blog Visits
This one is a bit tricky, since our blog is actually hosted on a different URL (blog.educatly.com). This means we actually need to deploy a different Container under the same account. Okay, not so tricky, just a little bit messy. Everything else works the same - you just need to remember that some of your Tags and Triggers are stored in a different Container. Tags and Triggers cannot cross-reference between Containers, so if you need the same Tag for user actions happening on the Blog (or any other additional website you want to be tracking from) and the original platform, you actually need to create that Tag in each Container.
In this case, we want to store both the Attribute which page the user last visited as well as the event of tracking all blog visits. In the case of the blog, we can simply trigger via the trigger type "Page Visit" - and in this case, we can even resort to firing this Trigger on All Page Views. So simple!
Next, we create the Tag. Let’s start with the Event - how can you easily track which blog post was visited? You could either write a Javascript function that gathers the URL from your browser window, parses it and saves that into Intercom… Ooooor you learn a new handy trick: Google Tag Manager Variables. In this case, the whole code would look like this:
Intercom('trackEvent', 'visited {{Page Path}}');
Let’s say the user visited https://blog.educatly.com/international-recruitment-in-2019-4-trends-you-need-to-focus-on (an example blog post from Educatly's blog). Then the Event would be saved in Intercom as visited international-recruitment-in-2019-4-trends-you-need-to-focus-on.
{{Page Path}} already does the entire job for you. You can refer to this page for more variables you can use. You could, for example, reference {{Click Text}} in your Event and use it to track every text (such as buttons) the user clicks on, without having to define a Trigger and Tag for each button individually.
For the Attribute, our code looks like this:
if (typeof(document.title) != 'undefined' && document.title != null){
blog_post = document.title
}
else{
blog_post = "";
}
window.intercomSettings = {
"blog_post": blog_post,
}
Intercom('update');
In line 7-10 you find what you are already familiar with: we are setting the Attribute blog_post with a variable that is being defined above and then update the Intercom container. Now the trickier part is how the variable blog_post gets defined. Let me run you through it.
Almost every page has a title. The title is what you see in the Tab. For example if you visit google.com the page title will be “Google”. Once you searched for something (i.e. laurinstahl.page) the title will change to “laurinstahl.page - Google Search”.
There is a Javascript function that can access this quite easily and this function is called document.title. So in the simplest way, we could just define the blog post with the following code:
blog_post = document.title;
However, it is good practice to validate any errors that might come up. It could happen that the page title is not defined or that it is empty. This is validated by the IF function in line 1. An IF function usually has a condition that is being checked. If it is true, a piece of code gets executed (whatever is within { }). It then can get followed by an else { }, where whatever is within the { } gets executed, if the IF statement is false. typeof(document.title) == 'undefined' checks whether an element with the type of document.title exists (i.e. is defined), && tells our IF condition that there is another condition that needs to be checked (similar to the AND() function in Excel or Sheets) and document.title == null checks whether the document.title is empty. However, if you were paying attention, you will have noticed that the line of code reads:
if (typeof(document.title) != 'undefined' && document.title != null){
Not
if (typeof(document.title) == 'undefined' && document.title == null){
!= is basically the reverse of ==. While == basically means IS, != means IS NOT. In human speak, our code block checks: IF there IS NO document.title and the document.title IS NOT empty, then blog_post is document.title, ELSE blog_post is empty.
Combining our Attribute and Event code, the entire codeblock for our Tag will be:
<script>
if (typeof(document.title) != 'undefined' && document.title != null){
blog_post = document.title
}
else{
blog_post = "";
}
window.intercomSettings = {
"blog_post": blog_post,
}
Intercom('update');
Intercom('trackEvent', 'visited {{Page Path}}');
</script>
Engagement
There are two types of Engagement. Events and Attributes, depending on what you want to track. In our case, we want to track how many followers a user has (Attribute), but also when a user follows someone (Event).
Let’s start with the Event. I won’t go into the details here. It is exactly the same as our Application example. On Educatly.com, you follow a user by pressing a Follow Button.
Simply identify the Follow Button properly with its Click Classes and Click Text and you have your Trigger. The Tag will simply read Intercom('trackEvent', ‘Followed); We didn’t implement tracking whom the user Followed, though. Why not? Remember, our 200 Events limitation. Whenever a new person gets followed by someone, this would mean a new Event being tracked. If you still want to do it, you would probably write a Javascript function that extracts the name of the user profile that is being viewed from the page and append the name to your string.
For the Attributes, we will re-use a Trigger we had already set-up. In the case of Educatly, the number of Followers is being displayed on the Dashboard. We have already set-up a Trigger for when the user views the Dashboard! So all we need is to create a new Tag and reference the same Trigger as before for our Profile Completion example.
The Tag has the following HTML code:
<script>
followers = document.getElementsByClassName("followers-details") [0].innerText.split("\n")[0];
window.intercomSettings = {
"followers": followers,
}
</script>
Before we explain how line 2 works, please note one important detail. We omitted the Intercom('update'); function. The reason being that we are already executing the Intercom('update'); function in our Profile Completion Tag. If we would keep it also in our Followers Tag, we would be executing this function twice. I have found in my testings that executing this function too many times on one page may lead to failures and errors.
Let’s have a look at our Javascript function to extract the followers (line 2)
followers = document.getElementsByClassName("followers-details")[0].innerText.split("\n")[0];
I do not have to explain document.getElementsByClassName("followers-details")[0] in detail, again. It works just the same as when we extracted Profile Completion. The element class that we’re looking at in this case is called "followers-details", and again we’re taking the 0st element on the page. Before we were using .innerHTML, now we’re using .innerText - that is simply because .innerHTML can sometimes pick up on additional elements, not just Text. Here, we’re not splitting by "%", but by "\n". \n means line-break. If you check the Dashboard, you will see that there is a Line Break between the numbers of Followers and the word Followers. We then extract the 0st element again and end up with safely extracting the number of followers from the webpage.

That’s it! You successfully replicated all examples that we are currently using at Educatly. However, there is so much more you can do. One of the things we’re currently working on is how we can accurately extract the User Preferences as they fill them, which would allow our operations team to effectively segment all our users for more effective customer support!
If you want to have something similar on your platform or are struggling with building other more advanced capabilities like these, please do get in touch with me. I’m sure I’ll be able to help you out!
.jpg)

